
7 Easy Dinner Recipes You’ll Make Every Week

Some dinners just make weeknights feel easier, and these are exactly that kind of meals. They’re simple, colorful, satisfying, and built around everyday ingredients like salmon, chicken, lentils, tofu, vegetables, grains, and creamy sauces that bring everything together. Each one feels wholesome and practical without being bland, and they all fit naturally into a regular dinner rotation.
What makes this collection especially useful is how balanced and approachable it is. You’ve got sheet pan meals, skillet dinners, grain bowls, and quick stir-fries, so there’s plenty of variety without anything feeling complicated. The wording stays food-focused and kitchen-friendly, which makes this a better fit for an AdSense-friendly recipe post while still sounding warm, natural, and helpful.
1. Sheet-Pan Salmon, Broccoli, and Quinoa
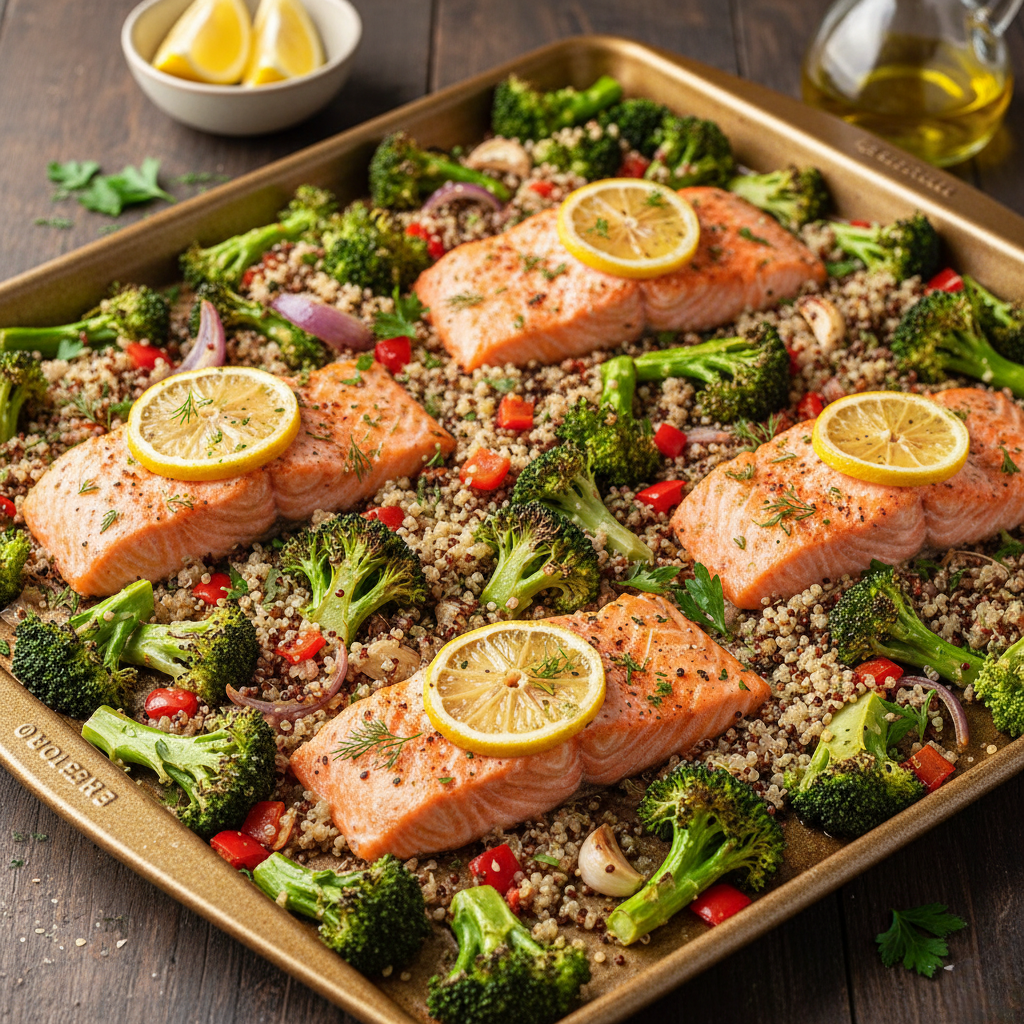
Sheet-pan salmon, broccoli, and quinoa is the kind of dinner that feels clean, fresh, and deeply satisfying at the same time. The salmon roasts until tender and flaky, the broccoli gets crisp around the edges, and the quinoa soaks up all the lemony juices from the pan. It’s a simple dinner that looks beautiful on the plate and tastes like far more effort than it takes.
What makes this recipe especially handy is how little cleanup it creates. The oven does most of the work, and once everything is roasted, all that’s left is scooping it into bowls and finishing with a squeeze of lemon or a spoonful of sauce.
Why You’ll Love This Recipe
- It’s a full dinner with protein, vegetables, and grains in one meal
- The salmon stays tender while the broccoli gets beautifully roasted
- It’s easy enough for weeknights but still feels fresh and polished
- Quinoa makes it more filling without making it heavy
- Leftovers hold up well for lunch the next day

- Times
- Description
- Image
- Ingredients
- Method
- Notes
- Nutrition
- Prep time: 10 minutes
- Cook time: 20 minutes
- Total time: 30 minutes
- Serves: 4
Ingredients
For the salmon and broccoli:
- 4 salmon fillets
- 4 cups broccoli florets
- 2 tablespoons olive oil
- 2 cloves garlic, minced
- 1 teaspoon paprika
- 1/2 teaspoon salt
- 1/4 teaspoon black pepper
- 1 lemon, sliced
For the quinoa:
- 1 cup quinoa
- 2 cups water or broth
- 1/4 teaspoon salt
Instructions
- 1)
1) Make sure to carefully follow each step of the instructions for the best results :
- Cook the quinoa.
Rinse the quinoa well, then add it to a saucepan with the water or broth and salt. Bring to a boil, reduce the heat, cover, and simmer until fluffy. Let it rest for a few minutes, then fluff with a fork. - Prep the sheet pan.
Preheat the oven to 400°F. Arrange the broccoli on one side of a large sheet pan and the salmon on the other. Drizzle everything with olive oil, then season with garlic, paprika, salt, and pepper. Tuck lemon slices around the pan. - Roast until tender.
Bake for 15 to 20 minutes, until the salmon flakes easily and the broccoli is lightly crisp at the edges. Spoon the salmon and broccoli over the quinoa and serve warm.
- Cook the quinoa.
Tips for the Best Sheet-Pan Salmon, Broccoli, and Quinoa
- Pat the salmon dry before seasoning so it roasts better
- Cut the broccoli into similar-sized florets for even cooking
- Don’t overcook the salmon or it can dry out quickly
- Use broth instead of water if you want more flavor in the quinoa
- Add the lemon after roasting for a brighter finish
- Line the pan for easier cleanup
Variations
- Spicy version. Add red pepper flakes or a little chili powder to the salmon seasoning.
- Garlic butter version. Melt a little butter with the garlic and spoon it over the salmon before roasting.
- Extra veggie version. Add zucchini, asparagus, or bell peppers to the sheet pan.
- Rice version. Use brown rice instead of quinoa if that’s what you already have cooked.
- Honey lemon version. Drizzle the salmon with a little honey before baking for a sweeter finish.
Can I Use Frozen Salmon Instead?
Yes, you can. Just thaw it fully first and pat it dry well so it roasts properly and doesn’t release too much water on the pan.
What to Serve with Sheet-Pan Salmon, Broccoli, and Quinoa
This dinner is already complete, but a few extras work nicely:
- A cucumber salad
- Lemon yogurt sauce
- Sliced avocado
- Roasted carrots
- Warm flatbread
- A simple green salad
Storage & Reheating
Store leftovers in an airtight container in the fridge for up to 3 days. Reheat gently in the microwave or enjoy cold as a grain bowl style lunch.
Nutrition (Per Serving – approx.)
| Per Serving | Amount |
|---|---|
| Calories | ~430 kcal |
| Protein | ~34g |
| Fat | ~18g |
| Carbohydrates | ~28g |
| Fiber | ~5g |
FAQ
Can I make this ahead of time?
Yes. Cook the quinoa ahead and roast the salmon and broccoli when you’re ready to eat.
Can I use another grain?
Absolutely. Brown rice, couscous, or cauliflower rice all work well here.
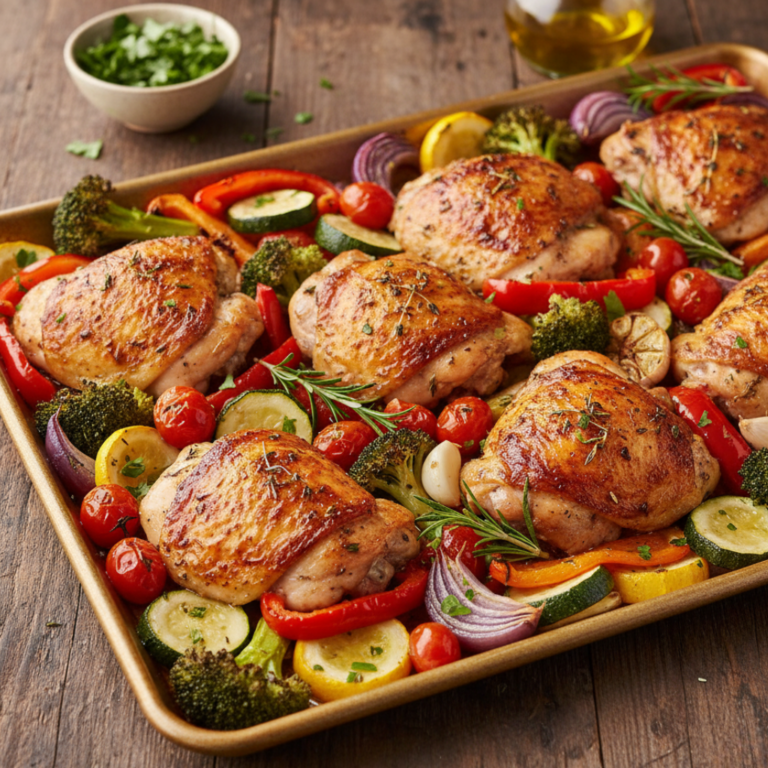
2. Chicken Thigh Veggie Tray Bake

Chicken thigh veggie tray bake is one of those no-fuss dinners that always earns a spot in the weekly rotation. The chicken turns golden and juicy, while the vegetables roast around it until tender, sweet, and caramelized at the edges. It’s cozy, practical, and exactly the kind of dinner that works when you want something dependable and flavorful.
What makes this recipe especially appealing is how little babysitting it needs. Once everything is seasoned and spread on the pan, the oven takes over and gives you a full meal with almost no effort.
Why You’ll Love This Recipe
- It’s a complete dinner on one tray
- Chicken thighs stay juicy and flavorful in the oven
- Roasted vegetables make it colorful and hearty
- It’s easy to adapt with whatever vegetables you have
- It’s great for meal prep and leftovers
- Times
- Description
- Image
- Ingredients
- Method
- Notes
- Nutrition
- Prep time: 15 minutes
- Cook time: 40 minutes
- Total time: 55 minutes
- Serves: 4
Ingredients
For the chicken:
- 6 bone-in, skin-on chicken thighs
- 2 tablespoons olive oil
- 1 teaspoon garlic powder
- 1 teaspoon dried oregano
- 1 teaspoon paprika
- 1 teaspoon salt
- 1/2 teaspoon black pepper
For the vegetables:
- 1 pound baby potatoes, halved
- 3 carrots, sliced
- 1 red onion, cut into wedges
- 1 zucchini, sliced
- 1 tablespoon olive oil
- 1/2 teaspoon salt
- 1/4 teaspoon black pepper
Instructions
- 1)
1) Make sure to carefully follow each step of the instructions for the best results :
- Season the chicken.
Preheat the oven to 425°F. In a bowl, mix the olive oil, garlic powder, oregano, paprika, salt, and pepper. Rub the mixture all over the chicken thighs. - Prep the vegetables.
Place the potatoes, carrots, onion, and zucchini on a large sheet pan. Drizzle with olive oil, season with salt and pepper, and toss to coat evenly. - Bake until golden.
Nestle the chicken thighs among the vegetables and roast for 35 to 40 minutes, until the chicken is cooked through and the vegetables are tender. Serve straight from the pan while everything is hot and juicy.
- Season the chicken.
Tips for the Best Chicken Thigh Veggie Tray Bake
- Cut harder vegetables smaller so they roast in time
- Don’t crowd the pan or the vegetables will steam
- Bone-in thighs give the juiciest result
- Add zucchini later if you like it firmer
- Broil for 2 minutes at the end for crispier skin
- Use parchment for easier cleanup
Variations
- Lemon herb version. Add lemon slices and extra thyme for a brighter flavor.
- Sweet potato version. Swap the potatoes for cubed sweet potatoes.
- Mediterranean version. Add olives and bell peppers for a more savory finish.
- Boneless version. Use boneless thighs and reduce the cooking time slightly.
- Garlic butter version. Finish with a little melted garlic butter before serving.
Can I Use Chicken Breasts Instead?
Yes, but they cook faster and can dry out more easily than thighs. If using breasts, check them early and remove them once they’re cooked through.
What to Serve with Chicken Thigh Veggie Tray Bake
This tray bake works well with simple sides like:
- Crusty bread
- Cooked rice
- Green salad
- Yogurt sauce
- Steamed green beans
- Hummus
Storage & Reheating
Store leftovers in the fridge for up to 4 days. Reheat in the oven or air fryer for the best texture.
Nutrition (Per Serving – approx.)
| Per Serving | Amount |
|---|---|
| Calories | ~470 kcal |
| Protein | ~32g |
| Fat | ~25g |
| Carbohydrates | ~24g |
| Fiber | ~4g |
Values are approximate and may vary depending on the exact ingredients used.
FAQ
Can I prep this ahead?
Yes. You can chop the vegetables and season the chicken ahead of time.
What vegetables work best?
Potatoes, carrots, onions, peppers, and zucchini all roast well with chicken thighs.
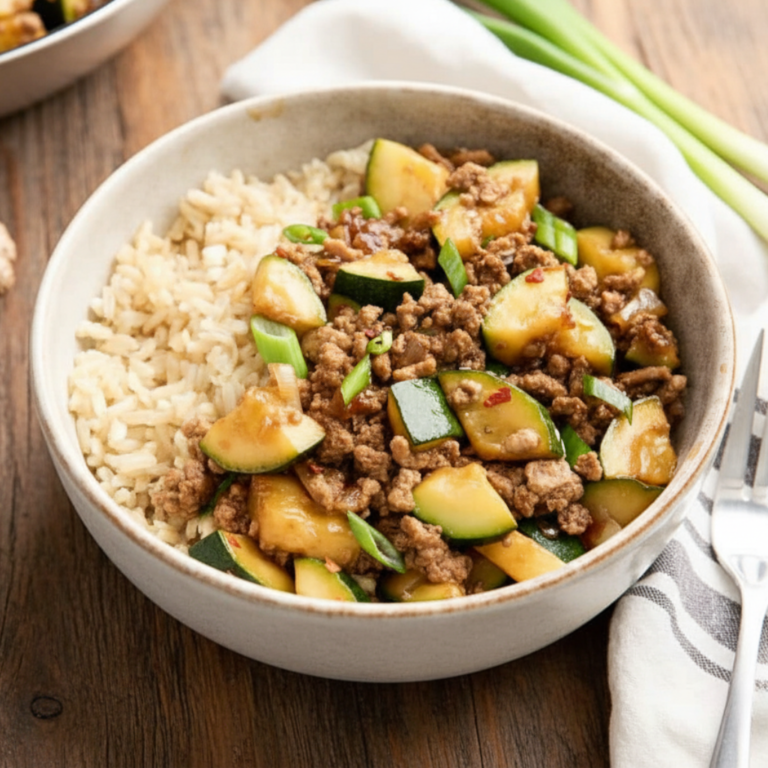
3. Turkey and Zucchini Skillet

Turkey and zucchini skillet is fast, savory, and perfect when you need dinner on the table without much planning. The turkey cooks up tender and well-seasoned, the zucchini softens just enough without turning mushy, and the whole skillet comes together in a way that feels simple but still very satisfying.
What makes this recipe such a useful weeknight option is how quickly it cooks. It’s a one-pan dinner that works well on its own or spooned over rice, quinoa, or pasta.
Why You’ll Love This Recipe
- It’s ready fast and uses one pan
- Ground turkey keeps it hearty without feeling too heavy
- Zucchini adds freshness and cooks quickly
- It’s easy to pair with grains or eat on its own
- Leftovers work well for lunch
- Times
- Description
- Image
- Ingredients
- Method
- Notes
- Nutrition
- Prep time: 10 minutes
- Cook time: 20 minutes
- Total time: 30 minutes
- Serves: 4
Ingredients
For the skillet:
- 1 pound ground turkey
- 1 tablespoon olive oil
- 1 small onion, diced
- 3 cloves garlic, minced
- 2 medium zucchini, diced
- 1 red bell pepper, diced
- 1 teaspoon Italian seasoning
- 1/2 teaspoon paprika
- 1/2 teaspoon salt
- 1/4 teaspoon black pepper
For finishing:
- 2 tablespoons tomato paste
- 1/4 cup broth
- 2 tablespoons chopped parsley
- Grated Parmesan, optional
Instructions
- 1)
1) Make sure to carefully follow each step of the instructions for the best results :
- Cook the turkey.
Heat the olive oil in a large skillet over medium heat. Add the onion and cook until softened, then stir in the garlic. Add the turkey and cook until browned, breaking it up with a spoon. - Add the vegetables.
Stir in the zucchini, bell pepper, Italian seasoning, paprika, salt, and pepper. Cook for 5 to 7 minutes until the vegetables are tender but still have a little bite. - Finish the skillet.
Stir in the tomato paste and broth, then let everything simmer for 2 to 3 minutes until lightly saucy. Finish with parsley and Parmesan if using.
- Cook the turkey.
Tips for the Best Turkey and Zucchini Skillet
- Don’t overcook the zucchini or it can get watery
- Brown the turkey well for the best flavor
- Use a large skillet so the ingredients sauté instead of steam
- Add the tomato paste near the end for deeper flavor
- A little Parmesan on top adds a nice savory finish
Variations
- Spicy version. Add chili flakes or diced jalapeño.
- Rice skillet version. Stir in cooked rice at the end to make it heartier.
- Cheesy version. Top with mozzarella and cover until melted.
- Mushroom version. Add sliced mushrooms with the zucchini.
- Tex-Mex version. Use cumin and chili powder instead of Italian seasoning.
Can I Use Ground Chicken Instead?
Yes, ground chicken works very well here and cooks in the same way. You may want to add a little extra oil if it’s especially lean.
What to Serve with Turkey and Zucchini Skillet
Try it with:
- Rice
- Quinoa
- Pasta
- Garlic bread
- Side salad
- Roasted potatoes
Storage & Reheating
Store in the fridge for up to 4 days. Reheat in a skillet over low heat or microwave in short intervals until hot.
Nutrition (Per Serving – approx.)
| Per Serving | Amount |
|---|---|
| Calories | ~290 kcal |
| Protein | ~28g |
| Fat | ~14g |
| Carbohydrates | ~10g |
| Fiber | ~2g |
Values are approximate and may vary depending on the exact ingredients used.
FAQ
Can I freeze it?
Yes, though the zucchini will be a bit softer after thawing.
Can I add more vegetables?
Definitely. Mushrooms, spinach, or chopped tomatoes all work well.
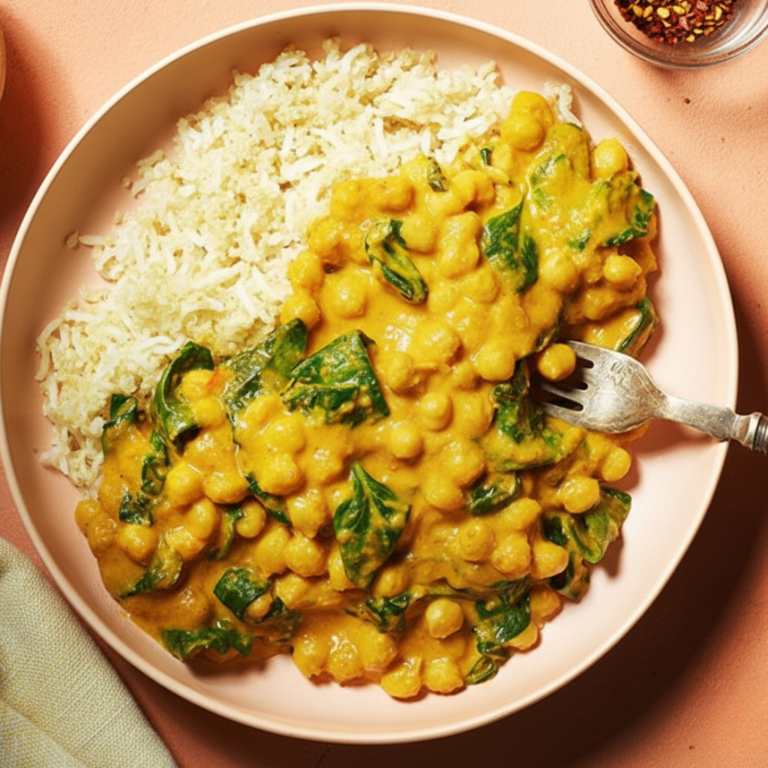
4. Chickpea Coconut Spinach Curry

Chickpea coconut spinach curry is rich, cozy, and full of warm flavor without being complicated. The sauce turns creamy from coconut milk, the chickpeas make it hearty, and the spinach melts into the pan for a dinner that feels deeply comforting and very easy to make.
What makes this recipe especially weeknight-friendly is that it leans on pantry staples. A can of chickpeas, a can of coconut milk, a handful of spinach, and a few spices are enough to turn into something that tastes like a proper dinner.
Why You’ll Love This Recipe
- It’s meatless but still hearty and filling
- The coconut milk makes the sauce rich and silky
- It uses mostly pantry-friendly ingredients
- Spinach adds color and freshness
- It tastes even better the next day
- Times
- Description
- Image
- Ingredients
- Method
- Notes
- Nutrition
- Prep time: 10 minutes
- Cook time: 20 minutes
- Total time: 30 minutes
- Serves: 4
Ingredients
For the curry:
- 1 tablespoon olive oil
- 1 small onion, diced
- 3 cloves garlic, minced
- 1 teaspoon grated ginger
- 2 cans chickpeas, drained and rinsed
- 1 can full-fat coconut milk
- 1 can diced tomatoes
- 2 cups fresh spinach
- 1 teaspoon curry powder
- 1/2 teaspoon cumin
- 1/2 teaspoon turmeric
- 1/2 teaspoon salt
- 1/4 teaspoon black pepper
For serving:
- Cooked rice
- Fresh cilantro
- Lime wedges
Instructions
- 1)
1) Make sure to carefully follow each step of the instructions for the best results :
- Cook the aromatics.
Heat the oil in a large skillet or saucepan over medium heat. Cook the onion until soft, then stir in the garlic and ginger. - Build the curry.
Add the curry powder, cumin, turmeric, salt, and pepper. Stir in the chickpeas, diced tomatoes, and coconut milk, then simmer for 10 minutes so the flavors come together. - Finish with spinach.
Add the spinach and stir until wilted. Serve warm over rice with cilantro and a squeeze of lime.
- Cook the aromatics.
Tips for the Best Chickpea Coconut Spinach Curry
- Use full-fat coconut milk for the creamiest sauce
- Let it simmer so the sauce thickens slightly
- Add spinach at the end so it stays bright
- Taste before serving and add more salt if needed
- A squeeze of lime lifts the whole dish
Variations
- Spicier version. Add chili flakes or curry paste.
- Lentil version. Stir in cooked lentils for extra texture.
- Vegetable version. Add cauliflower or bell peppers.
- Tofu version. Add pan-seared tofu cubes.
- Tomato-rich version. Use crushed tomatoes for a deeper sauce.
Can I Use Light Coconut Milk Instead?
Yes, but the sauce will be thinner and less rich. Full-fat coconut milk gives the best texture here.
What to Serve with Chickpea Coconut Spinach Curry
Serve it with:
- Steamed rice
- Quinoa
- Naan
- Cucumber salad
- Roasted cauliflower
- Yogurt on the side
Storage & Reheating
Store in the fridge for up to 4 days. Reheat gently on the stove or in the microwave until hot.
Nutrition (Per Serving – approx.)
| Per Serving | Amount |
|---|---|
| Calories | ~390 kcal |
| Protein | ~13g |
| Fat | ~21g |
| Carbohydrates | ~38g |
| Fiber | ~9g |
Values are approximate and may vary depending on the exact ingredients used.
FAQ
Can I make it ahead?
Yes, and it tastes even better after the flavors sit for a bit.
Can I freeze it?
Yes. Let it cool completely before freezing in airtight containers.
5. Tofu Stir-Fry with Cabbage and Edamame
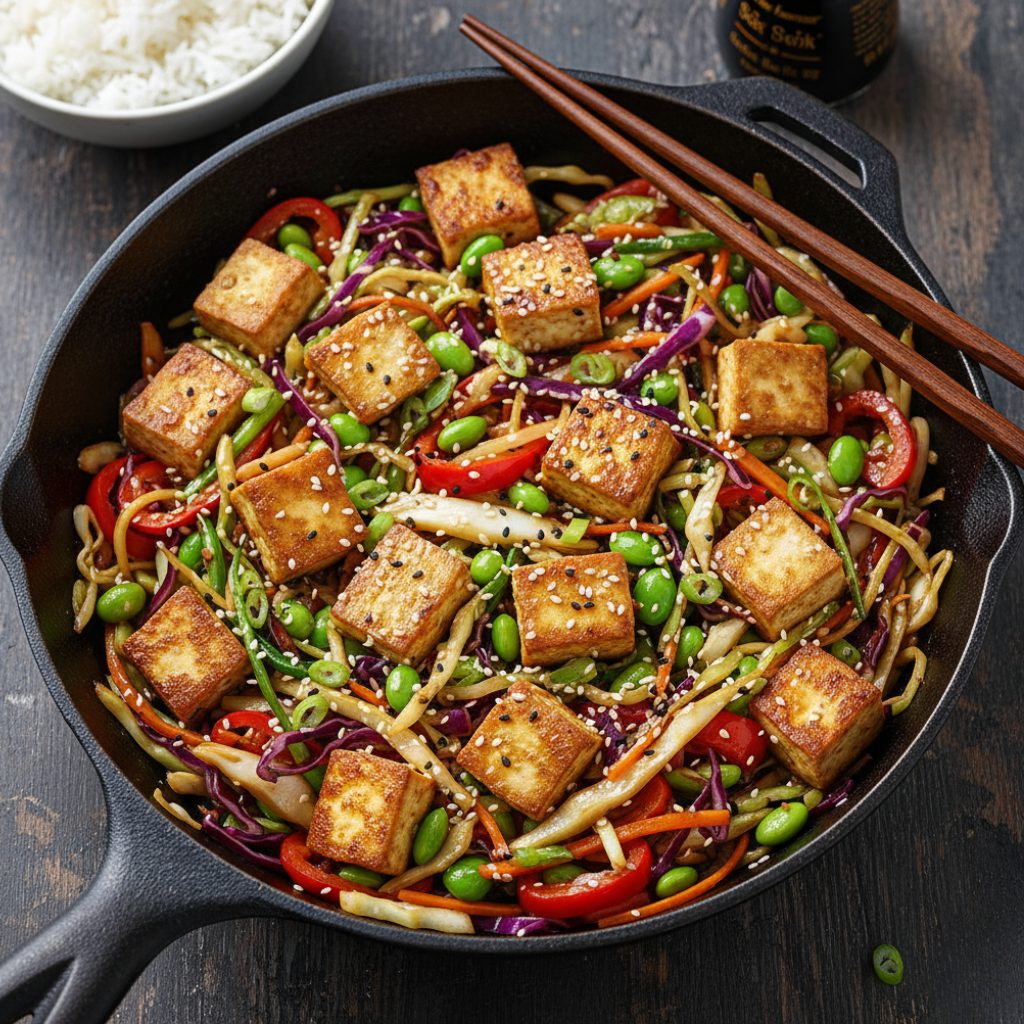
Tofu stir-fry with cabbage and edamame is crisp, savory, and packed with texture. The tofu gets golden at the edges, the cabbage softens while still keeping a little bite, and the edamame makes the whole dish feel more substantial and satisfying.
What makes this recipe such a great weeknight option is its speed. Once the tofu is pressed and cut, everything cooks quickly in one pan and comes together with a simple sauce.
Why You’ll Love This Recipe
- The leftovers are great the next day
- It’s quick and packed with texture
- Tofu and edamame make it more filling
- Cabbage is affordable and cooks beautifully
- It’s easy to customize with extra vegetables

- Times
- Description
- Image
- Ingredients
- Method
- Notes
- Nutrition
- Prep time: 15 minutes
- Cook time: 15 minutes
- Total time: 30 minutes
- Serves: 4
Ingredients
For the stir-fry:
- 1 block extra-firm tofu, pressed and cubed
- 1 tablespoon cornstarch
- 2 tablespoons oil
- 4 cups shredded cabbage
- 1 cup shelled edamame
- 2 carrots, julienned
- 2 cloves garlic, minced
- 1 teaspoon grated ginger
For the sauce:
- 3 tablespoons soy sauce
- 1 tablespoon sesame oil
- 1 tablespoon rice vinegar
- 1 teaspoon honey or maple syrup
Instructions
- 1)
1) Make sure to carefully follow each step of the instructions for the best results :
- Cook the tofu.
Toss the tofu with cornstarch. Heat oil in a skillet and cook the tofu until golden on all sides, then remove it to a plate. - Stir-fry the vegetables.
Add the cabbage, edamame, carrots, garlic, and ginger to the pan. Cook until the vegetables are tender-crisp. - Add the sauce.
Return the tofu to the pan. Stir together the sauce ingredients, pour them in, and toss everything together until glossy and hot.
- Cook the tofu.
Tips for the Best Tofu Stir-Fry with Cabbage and Edamame
- Press the tofu well before cooking
- Use high heat for the best texture
- Don’t overcook the cabbage
- Add the sauce at the end so it stays glossy
- Cornstarch helps the tofu crisp up better
Variations
- Spicy version. Add sriracha or chili garlic sauce.
- Noodle version. Serve over rice noodles.
- Mushroom version. Add sliced mushrooms for more depth.
- Peanut version. Stir a spoonful of peanut butter into the sauce.
- Broccoli version. Replace some cabbage with broccoli florets.
Can I Use Another Protein Instead?
Yes, this recipe also works well with shrimp or chicken if you want a different protein. Just cook it separately first, then toss it back in with the sauce.
What to Serve with Tofu Stir-Fry with Cabbage and Edamame
Good pairings include:
- Jasmine rice
- Brown rice
- Rice noodles
- Cucumber salad
- Steamed dumplings
- Extra chili sauce
Storage & Reheating
Store leftovers in the fridge for up to 3 days. Reheat in a skillet for the best texture.
Nutrition (Per Serving – approx.)
| Per Serving | Amount |
|---|---|
| Calories | ~310 kcal |
| Protein | ~18g |
| Fat | ~18g |
| Carbohydrates | ~20g |
| Fiber | ~6g |
Values are approximate and may vary depending on the exact ingredients used.
FAQ
Do I need to press the tofu?
Yes, it helps remove excess moisture and gives you a better texture.
Can I use bagged coleslaw mix?
Absolutely. It’s a great shortcut in this recipe.
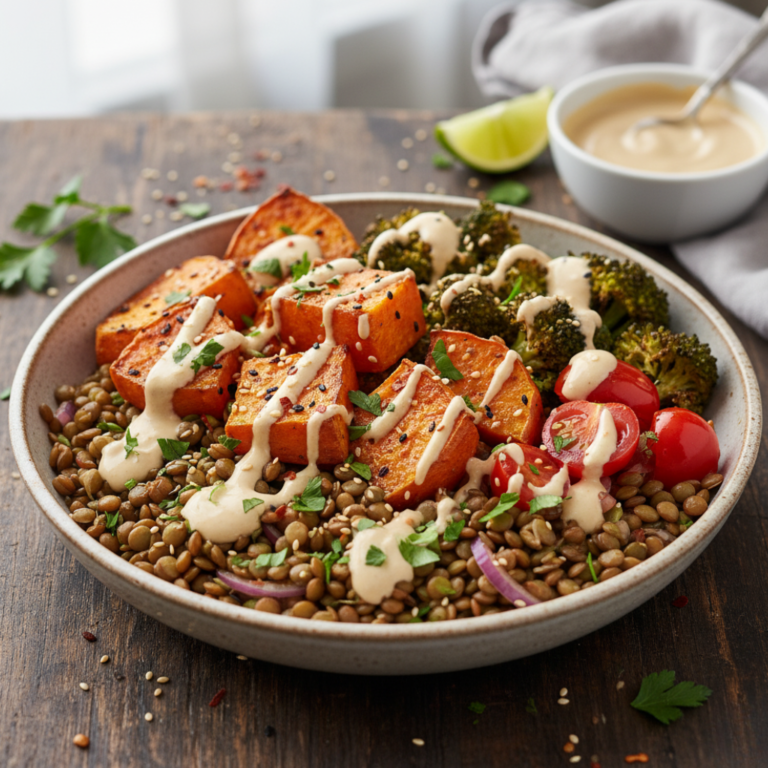
6. Lentil Bowl with Roasted Sweet Potato and Tahini

Lentil bowls with roasted sweet potato and tahini are colorful, hearty, and deeply satisfying in that simple, everyday way. The sweet potatoes roast until soft and caramelized, the lentils make the bowl substantial, and the tahini ties everything together with a creamy, nutty finish.
What makes this bowl such a strong weeknight dinner is how flexible it is. You can roast the vegetables, warm the lentils, whisk the sauce, and build everything however you like.
Why You’ll Love This Recipe
- It’s filling and built from simple ingredients
- Roasted sweet potato adds warmth and natural sweetness
- Lentils make the bowl hearty and practical
- Tahini dressing adds richness without much effort
- It’s easy to prep components ahead
- Times
- Description
- Image
- Ingredients
- Method
- Notes
- Nutrition
- Prep time: 15 minutes
- Cook time: 30 minutes
- Total time: 45 minutes
- Serves: 4
Ingredients
For the bowl:
- 2 medium sweet potatoes, cubed
- 1 tablespoon olive oil
- 1/2 teaspoon salt
- 1 cup cooked lentils
- 2 cups baby spinach
- 1/2 cucumber, diced
- 1/4 red onion, thinly sliced
For the tahini dressing:
- 1/4 cup tahini
- 2 tablespoons lemon juice
- 1 tablespoon olive oil
- 1 small garlic clove, grated
- 2 to 3 tablespoons water
- Salt, to taste
Instructions
- 1)
1) Make sure to carefully follow each step of the instructions for the best results :
- Roast the sweet potatoes.
Preheat the oven to 425°F. Toss the sweet potatoes with olive oil and salt, spread them on a pan, and roast until tender and caramelized. - Make the dressing.
Whisk together the tahini, lemon juice, olive oil, garlic, water, and salt until smooth and pourable. - Assemble the bowls.
Divide the spinach between bowls, then top with lentils, sweet potato, cucumber, and red onion. Drizzle with tahini dressing and serve.
- Roast the sweet potatoes.
Tips for the Best Lentil Bowl with Roasted Sweet Potato and Tahini
- Roast the sweet potatoes in a single layer for better browning
- Thin the tahini slowly so it stays smooth
- Use cooked lentils to keep prep quick
- Add greens at the base so the warm ingredients soften them slightly
- Season each component so the bowl tastes balanced
Variations
- Grain bowl version. Add quinoa or brown rice.
- Crunchy version. Top with pumpkin seeds or chopped almonds.
- Herby version. Add parsley or dill.
- Spicy version. Add chili flakes to the tahini.
- Feta version. Crumble a little feta on top for a salty finish.
Can I Use Canned Lentils Instead?
Yes, canned lentils work very well here. Just rinse and drain them well before using.
What to Serve with Lentil Bowl with Roasted Sweet Potato and Tahini
This bowl pairs nicely with:
- Warm pita
- Soup
- Roasted broccoli
- Cucumber salad
- Hummus
- Lemon water or iced tea
Storage & Reheating
Store the components separately if possible for the best texture. The roasted sweet potatoes and lentils reheat well, and the dressing can be kept in the fridge for several days.
Nutrition (Per Serving – approx.)
| Per Serving | Amount |
|---|---|
| Calories | ~360 kcal |
| Protein | ~12g |
| Fat | ~14g |
| Carbohydrates | ~46g |
| Fiber | ~11g |
Values are approximate and may vary depending on the exact ingredients used.
FAQ
Can I meal prep this?
Yes, it’s excellent for meal prep because the components store well separately.
Can I use another dressing?
Yes, but lemon tahini works especially well with the sweet potatoes and lentils.
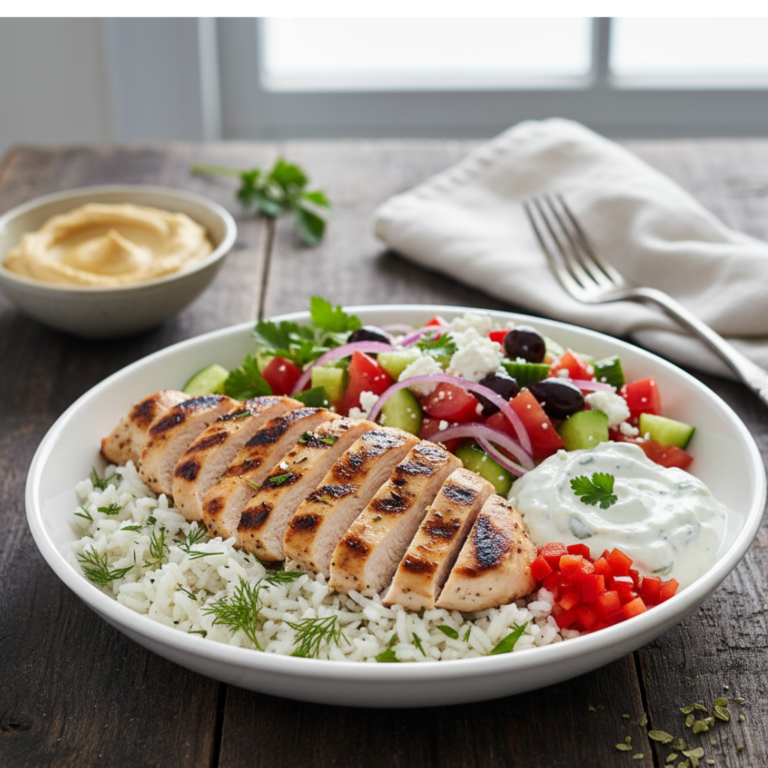
7. Greek-Style Chicken Bowl

Greek-style chicken bowls are bright, savory, and incredibly easy to keep on repeat. The chicken is juicy and well-seasoned, the vegetables stay crisp and fresh, and everything comes together with a creamy sauce or a spoonful of hummus for a dinner that feels balanced and full of flavor.
What makes this recipe especially useful is its flexibility. You can use rice, quinoa, or lettuce as the base, and once the chicken is cooked, the rest is just assembling fresh ingredients into bowls.
Why You’ll Love This Recipe
- It’s fresh, colorful, and easy to customize
- The chicken works with rice, quinoa, or greens
- It’s great for meal prep lunches and dinners
- The toppings add lots of texture and flavor
- It feels light while still being filling
- Times
- Description
- Image
- Ingredients
- Method
- Notes
- Nutrition
- Prep time: 15 minutes
- Cook time: 20 minutes
- Total time: 35 minutes
- Serves: 4
Ingredients
For the chicken:
- 1 1/2 pounds boneless skinless chicken thighs or breasts
- 1 tablespoon olive oil
- 1 teaspoon dried oregano
- 1 teaspoon garlic powder
- 1/2 teaspoon paprika
- 1/2 teaspoon salt
- 1/4 teaspoon black pepper
- Juice of 1/2 lemon
For the bowl:
- 2 cups cooked rice or quinoa
- 1 cup cucumber, diced
- 1 cup cherry tomatoes, halved
- 1/4 red onion, thinly sliced
- 1/2 cup olives
- 1/2 cup hummus or tzatziki
- Chopped parsley
Instructions
- 1)
1) Make sure to carefully follow each step of the instructions for the best results :
- Season and cook the chicken.
Coat the chicken with olive oil, oregano, garlic powder, paprika, salt, pepper, and lemon juice. Cook in a skillet or grill pan until golden and cooked through, then let it rest before slicing. - Prep the bowls.
Divide the rice or quinoa between bowls. Arrange the cucumber, tomatoes, red onion, and olives around the edges. - Assemble and serve.
Top each bowl with sliced chicken, a spoonful of hummus or tzatziki, and chopped parsley. Serve warm or chilled.
- Season and cook the chicken.
Tips for the Best Greek-Style Chicken Bowl
- Let the chicken rest before slicing
- Use thighs for juicier meat
- Season the grains lightly so the whole bowl tastes better
- Slice the vegetables small for easier eating
- Add the sauce just before serving for the freshest texture
Variations
- Low-carb version. Use lettuce instead of grains.
- Feta version. Add crumbled feta on top.
- Spicy version. Add chili flakes or spicy hummus.
- Wrap version. Turn the bowl into a pita wrap.
- Extra veggie version. Add roasted zucchini or peppers.
Can I Use Rotisserie Chicken Instead?
Yes, that’s a great shortcut. Just season it lightly with lemon, oregano, and olive oil so it blends in with the rest of the bowl.
What to Serve with Greek-Style Chicken Bowl
A few easy additions are:
- Warm pita
- Extra hummus
- Greek salad
- Roasted potatoes
- Lemon rice
- Cucumber yogurt dip
Storage & Reheating
Store the chicken, grains, and vegetables separately if possible for the best freshness. Reheat the chicken and grains, then assemble the bowls just before serving.
Nutrition (Per Serving – approx.)
| Per Serving | Amount |
|---|---|
| Calories | ~440 kcal |
| Protein | ~34g |
| Fat | ~18g |
| Carbohydrates | ~30g |
| Fiber | ~5g |
Values are approximate and may vary depending on the exact ingredients used.
FAQ
Can I make this ahead?
Yes, this is one of the easiest bowls to prep ahead for lunches or quick dinners.
What sauce works best?
Tzatziki and hummus are both great, depending on whether you want something creamy and tangy or richer and nuttier.